
How to Convert Image to Excel in Seconds (Step-by-Step Guide)
Still copying rows from a photo into Excel one cell at a time? Manual entry is slow, error-prone, and drains your focus.
This tutorial walks you through the exact workflow our AI-powered image to Excel converter uses to move every table from a JPG, PNG, or scanned document into a clean spreadsheet in just a few clicks. Whether you need a rapid JPG to Excel export or want to convert a PNG invoice into Excel, the process is identical—and it takes less than 10 seconds per file.
Step-by-Step Tutorial
Step 1: Upload Your Table Image
Open jpg-to-excel.com. Drag and drop any table image into the upload area, or click Choose File to select a JPG, PNG, or other supported format from your computer. Need to convert a PDF screenshot hosted online? Click Add Link and paste a public image URL to start the JPG to Excel or PNG to Excel workflow immediately.
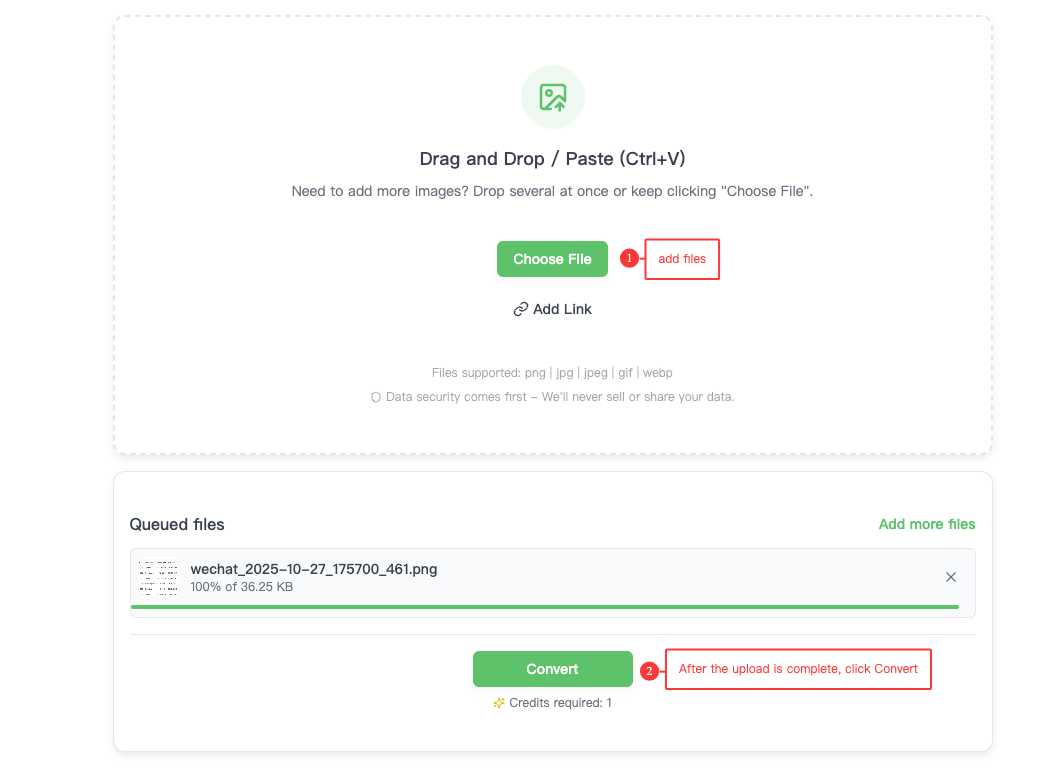
Step 2: Let the AI Detect Tables Automatically
After uploading, you’ll see the conversion progress page. Our AI instantly analyzes the image to map the table structure, text, and numbers—no need to adjust columns or OCR settings manually. Progress updates in real time, and once the image to Excel conversion is complete you’ll get a clear summary plus a button that takes you to the download screen.

Step 3: Download Your Excel Spreadsheet
Press the download button to jump to the results page. Every file you processed—bulk uploads included—appears with filename, estimated size, row count, and a Download action.

Want to double-check the output before saving it? Click Preview Data. A modal opens with an Excel-style grid rendered directly in the browser, so you can confirm headers, totals, and formatting long before the final PNG to Excel file lands on your desktop.
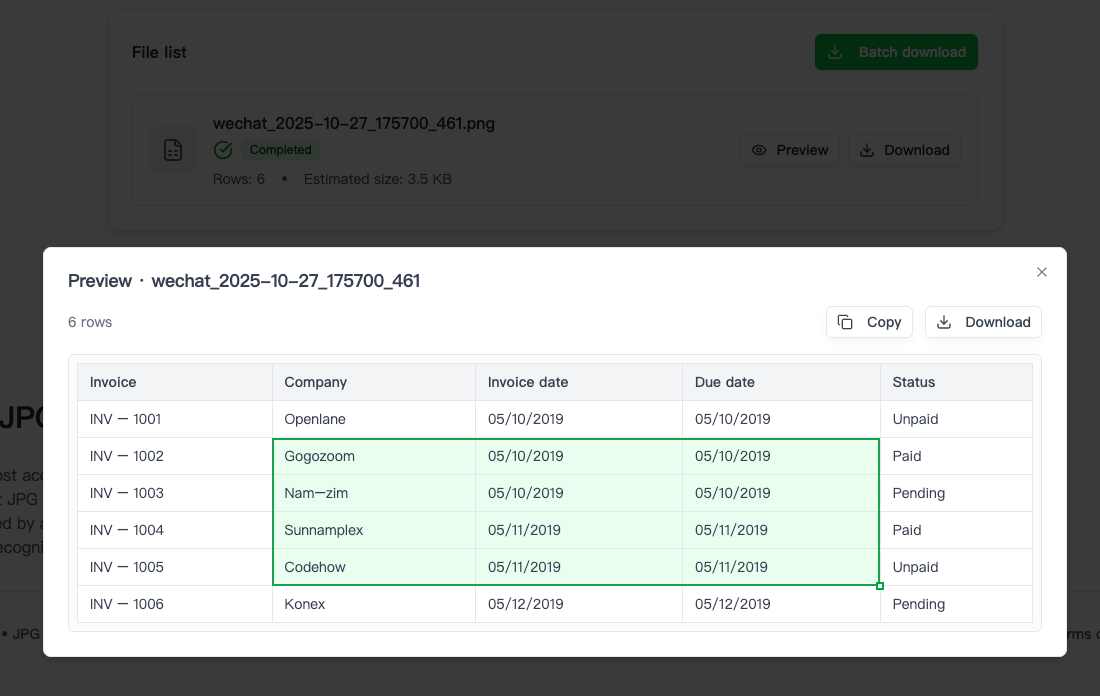
We optimized the experience for power users: select any cell range and copy it straight into your local spreadsheet, use the Copy All shortcut for instant CSV-style data, or hit Download for a standard XLSX file that works in Microsoft Excel, Google Sheets, Apple Numbers, WPS, and more.
That’s it—the image to Excel conversion is finished, and the sheet is ready for reporting, accounting, or data analysis.
Expert Tips for Higher Accuracy
- Start with a sharp image: Shoot or scan tables in high resolution with even lighting. Crisp edges raise JPG to Excel accuracy dramatically.
- Keep the table flat: Photograph directly above the page to avoid perspective distortion that can warp columns during the image to Excel extraction.
- Remove visual noise: Clean backgrounds and fewer stickers, watermarks, or surrounding text give the AI a clear view of your rows and headers.
Frequently Asked Questions
-
Why are a few characters incorrect after conversion?
Low-resolution photos or blurred print are the usual culprits. Capture a clearer image or boost contrast before uploading, then run the image to Excel conversion again. The preview pane also lets you make quick edits before downloading.
-
Will large images fail to upload?
The tool handles large files without trouble. For faster uploads and less bandwidth, compress anything over 10 MB only if you can maintain readability. Sharp PNG to Excel conversions still require precise text and grid lines.
Ready to Automate Data Entry?
You now have a repeatable system for every JPG to Excel, PNG to Excel, or scanned image to Excel job on your list. No matter if you’re processing receipts, directories, or multi-page reports, the AI converts them into editable spreadsheets in record time.
Take it for a spin—your next dataset is a drag-and-drop away.
Upload your table image now and experience pixel-perfect Excel exports.
Author
Categories
More Posts

What is JPG to Excel OCR? Everything You Need to Know
Discover how OCR technology converts JPG images to Excel spreadsheets. Learn the complete process, benefits, limitations, and when traditional OCR might not be enough for complex table recognition.

How AI Transforms JPG to Excel Conversion: A Deep Dive into jpg to excel converter ai
Discover how AI-powered JPG to Excel converters outperform traditional OCR. Learn why deep learning technology achieves 95%+ accuracy on complex tables with merged cells, multi-level headers, and real-world image quality issues.

How to Bulk Convert Multiple Table Images to Excel in One Click
Stop typing table data one by one! This comprehensive guide shows how to use AI-powered technology to bulk convert multiple table images to Excel files online, with support for merged cells and automatic table structure recognition—boosting efficiency by 5-20x.